The Art of Construction
Overview
In the math project, Art of Construction, we had to choose, sketch, and embellish an image of our choice. However, we had to use geometric construction in most parts of our image, reconstructing it essentially. The only materials we could use were a straight edge, and a compass. Meaning that we could not measure angles or side lengths in order to become better familiarized with geometric construction. We had to first choose an image, sketch it, construct it, and reconstruct/embellish it, all using geometric construction.
Choosing and Sketching the Image
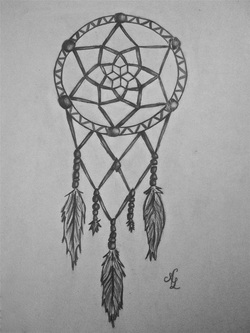
For the first part of the Art of Construction, we were to choose our image to geometrically reconstruct. This image had to have one of each of the following: an equilateral triangle, a regular polygon, a rosette or petal flower, a circle, and a square. I decided that I wanted to do something that was both not so challenging and not so easy at the same time, so I chose a dream catcher. The reasons I chose this image were also because I had a great idea of embellishing the image from the start and because the dream catcher also had a variety of shapes that I could work with.
First Draft of Construction
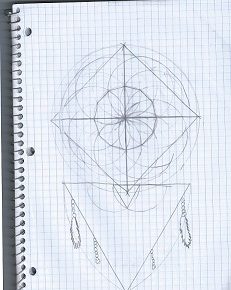
In the second part of the Art of Construction project, we had to actually construct the various shapes in our image using a straight edge and a compass(and yes, a pencil). We could either construct just what was in our image, or we could improvise and make some additions to fill the required number of constructions. In order to make my image, I first started out with just using a compass to draw a circle, I then drew a straight line through the midpoint of the circle and proceeded to constructing a perpendicular line. To draw the 12 sides required for my image, I placed the point of my compass on each spot the perpendicular lines touched the circle. Once the point was on the desired spot, I placed the lead on the midpoint of the circle, and drew an arc from one side of the circle to the other. I repeated this process for the other three points. Then, using a straight edge, I connected each point to each other, creating a 12 sided regular polygon. Then, from each of the do-decagon's angles, I placed the point of my compass on the angle and placed the lead on the midpoint and drew a circle for each angle. Then, for the bottom portion, I drew an equilateral triangle, along with a smaller one by drawing the base of the triangle, placing both ends of my compass on either end and drawing a semi circle for both sides, then connected the base to the point at which the arcs intersect.
The Final Creative Piece
In our final benchmark in this project, we had to find a creative way to embellish our image on construction paper or canvas. While creating my final piece, instead of just drawing a regular dream catcher, I decided to draw the web-like part of it, and for the feather part of it, I used real beads and feathers to make the piece "come alive" a little more. I had this idea ever since the beginning of the project and had all of the stuff required to pull it off, so I thought it would look nicer, and be a little easier at the same time if I added the real life beads and feathers.
Reflection
I did not have many troubles in this project. I found it quite fun and slightly challenging at the same time. One obstacle I did have to overcome was scanning my BM #2 because my printer is really messed up and doesn't work sometimes, but I eventually got it to work and included the BM #2 in my DP.
